Asset Page Overview
This quick guide will show you how to navigate the asset page, so that you can quickly get familiar with the asset information available.
STEP 1 - Choose the asset
Find and open the asset that you want to look at, using the map or search tools.
See the "Find an Asset" guide if you need help finding the asset you want.
STEP 2 - View asset sections
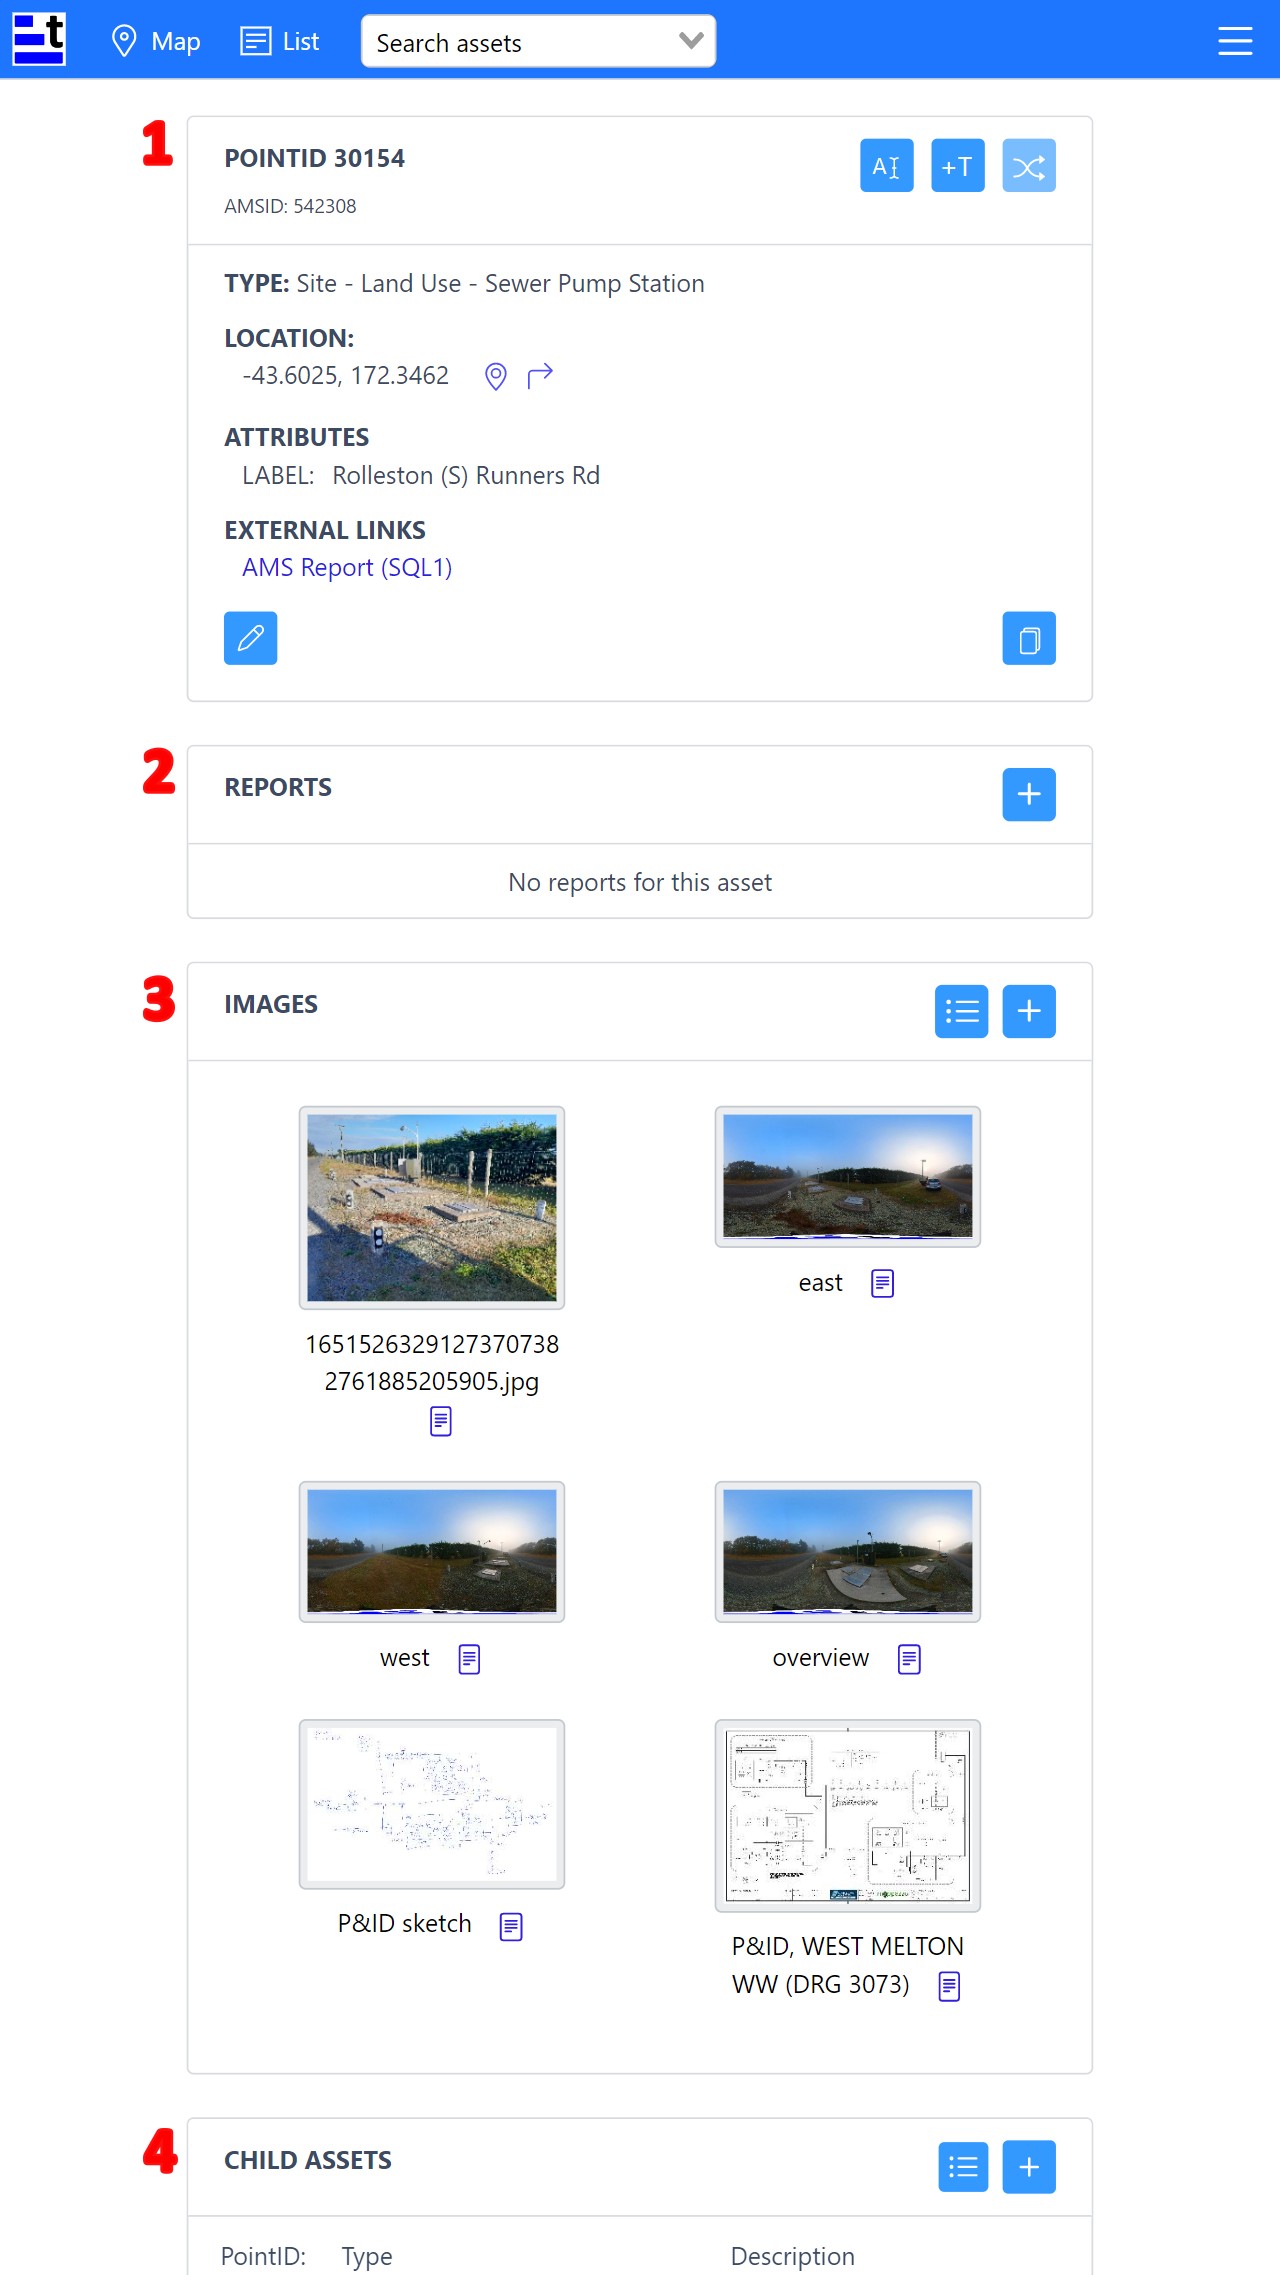
When you open an asset, it shows the asset information page. There are four main sections.

| Ref | Section | Description |
|---|---|---|
| 1 | Asset details | Has all the useful information for identifying an asset. |
| 2 | Reports | Shows any reports (condition reports, faults, or notes) that have been done for this asset. The three most recent reports are shown here. |
| 3 | Images | Has thumbnails of the images that are loaded for this asset. |
| 4 | Child assets | If the asset you are viewing is a parent asset, the children of this asset will be listed here in a filtered table. |
STEP 3 - Explore asset features
Let's look at the key features of each section, starting with the asset details.
Asset details
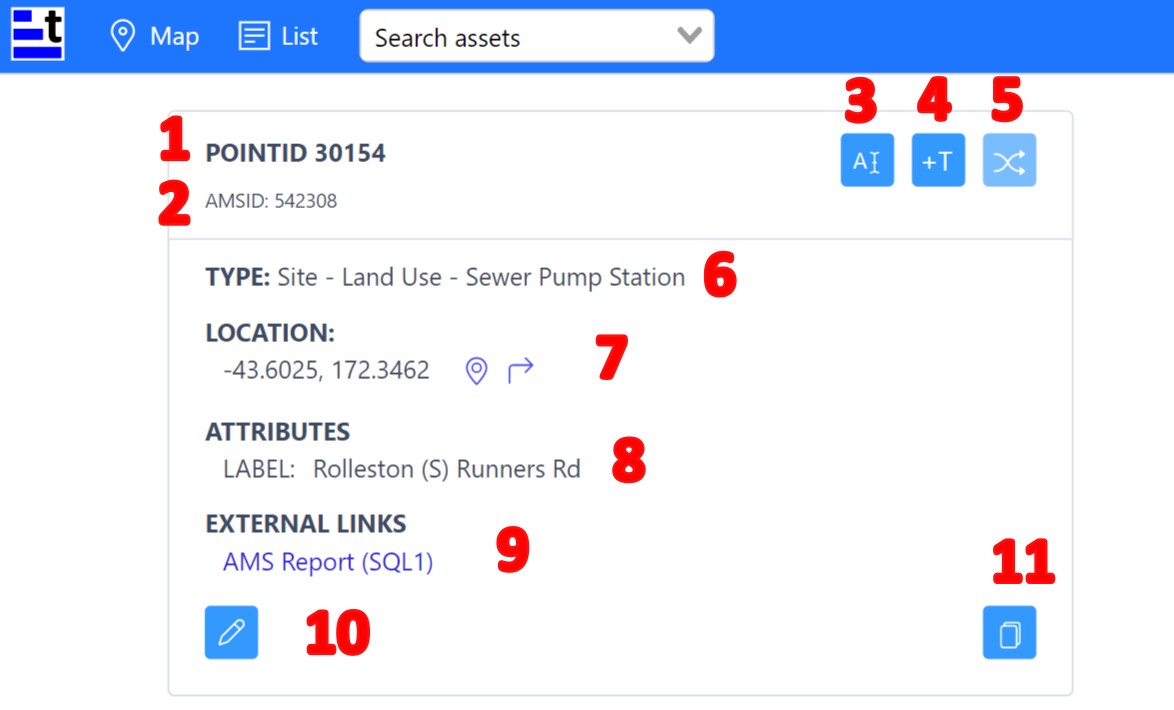
This is the first section when viewing an asset.

| Ref | Name / Icon | Action / Feature |
|---|---|---|
| 1 | Point ID | An ID unique to each asset, that is generated when the asset is first added into Trakk. |
| 2 | AMS ID | An optional ID, unique to each asset, which is used to match back to an external or previous asset management system if needed. |
| 3 |  | Click to change the point ID for this asset. |
| 4 | Click to add or update the tag for this asset. | |
| 5 | Workflow button (future feature under development) | |
| 6 | Type | Describes the type of asset, and is used to categorise or group assets of the same type. |
| 7 | Location | This shows the GPS coordinates of where the asset is located. Some assets may not have a location, but this can always be added or changed if needed. |
| The map icon will show the asset on the map view. | ||
| The directions icon will find directions from your current location to the asset's location using Google maps. | ||
| 8 | Attributes | Shows any relevant attributes like the label or title, which help to identify or confirm that you are looking at the correct asset. |
| 9 | External links | If there are any relevant external links to other asset management systems (AMS) or other places, they will be listed here as clickable links that will open in a new browser tab. |
| 10 | Click to edit this asset. It will open the asset editing page. | |
| 11 | Click to copy information from this asset in order to create a new asset. |
Reports
This is the second section when viewing an asset.
The first example shown below is from the parent asset, which will typically have no reports. The second example is from a child asset, which does have a report (a condition report).


The reports are sorted so that the newest or most recent are displayed at the top. Up to three reports (notes, faults or condition reports) will be visible at a glance. To see more than three, you'll need to click to expand the list.
| Ref | Name / Icon | Action / Feature |
|---|---|---|
| 1 | Click to add a new report. Report types include a condition report, fault, or notes. | |
| 2 | Report tile | Click on the report to open and view it. |
See the "Reports" guide for more information about using the reports feature.
Images
This is the third section when viewing an asset.
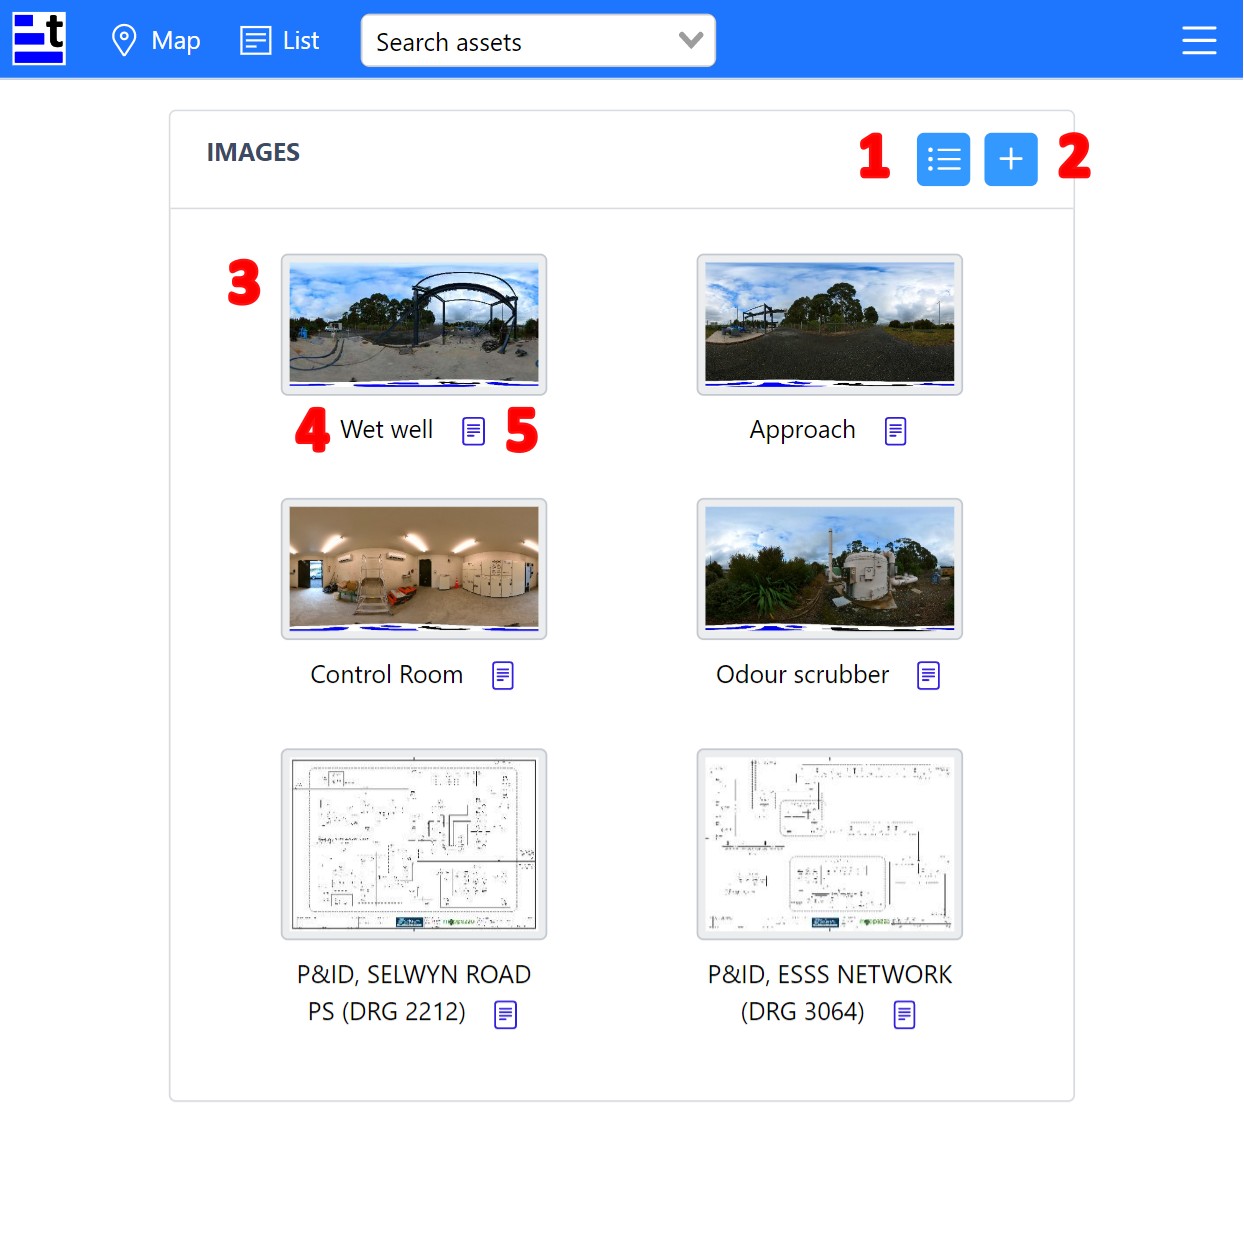
Photographs that you've taken can be uploaded to the assets in Trakk. Once uploaded, they can be seen as thumbnails in the images section.
There is also the ability to upload P&ID diagrams as images for an asset, which makes them quick and easy to locate and view.

| Ref | Name / Icon | Action / Feature |
|---|---|---|
| 1 | Click to go to the list view of images for this asset. | |
| 2 | Click to add a new image for this asset. | |
| 3 | Image thumbnail | Click to open the image and view it fullscreen. |
| 4 | Image label | This is the title of the image, to help identify what the photograph contains. Click to open the image and view it fullscreen. |
| 5 | Click to open the image record. This gives meta-details about the image itself, such as the label, ID, file size, links, etc. |
Child assets
This is the last section when viewing an asset.
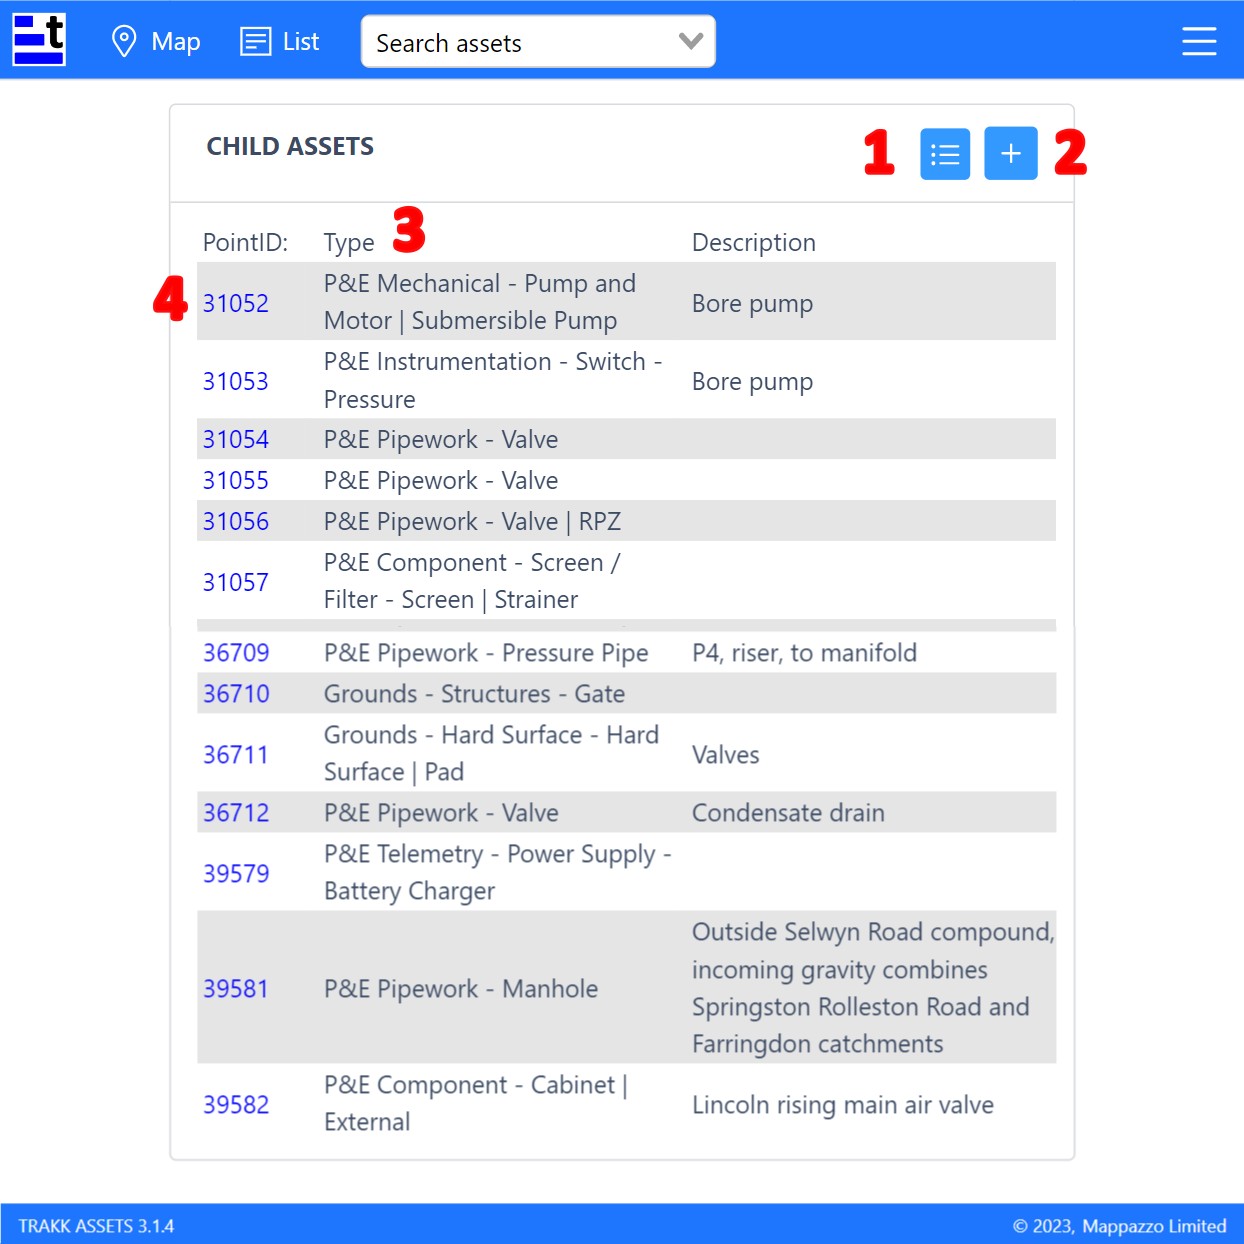
If the asset you're viewing is a parent asset, it's child assets will be listed in this section. You can then scroll through the linked child assets and view their information as you need to, from within the parent asset itself, without having to search for the child assets individually.

| Ref | Name / Icon | Action / Feature |
|---|---|---|
| 1 | Click to go to the list view of child assets for this parent asset. | |
| 2 | Click to add a new child asset to this asset. | |
| 3 | Table headings | The child assets table is sorted numerically by the Point ID (0-9) as a default. Click on the Type heading to sort the table by the type (A-Z) instead. Click on Description heading to sort by the description (A-Z). |
| 4 | Point ID | This is the Point ID of the child asset. Click on it to go to the asset information page for that asset. |
If the asset you are viewing has no child assets, there will be no child assets shown in this section.

You can always add a child asset using the add asset button if needed. ![]()
STEP 4 - Close asset page
To close the asset information page, you can click the back button on your browser to return to the previous screen. If you prefer, you can also navigate away to a new page using the map or list buttons, or a child asset Point ID link.
